I throw all my tmux configuration (along with some basic alacritty and
starship configuration) into a nix
module.
I really enjoy using it so far. I hope it can give you some ideas about
how to potentially improve your workflow
Longer version
Before using Nix, I had very limited experience with Tmux. I think I
only used once when I ssh into some ec2 box for doing mutlipy long
running jobs. After adpating Nix, I started to try out Alacirtty (I was
having a hard time to get Kitty build on MacOS with Nix), I really like
Alacirtty, but it doesn’t support tabs or split, the community
recommends using window manager or terminal multiplexer. The idea didn’t
bother me too much. (I brought a tmux
2 book long before that,
never read it), I thought to myself: maybe this is a good oppurity to
learn tmux. So I skip through the book, and set up tmux with basic
configuration using nix home manager, and back to everyday work. I
didn’t leverage tmux too much, and I often feel like I should spend some
more time to tweak my configuration, so it suits my use case better. One
day I came across waylonwalker’s
blog, which introduce Chirs
Toomy’s thoughtbot course on tmux to me. These materials really give me
lots of ideas, and after some embarrassing long hours, I finally manage
to put all my tmux configuration into a single nix module.
Here are some lessons and tricks I learned:
display-popup and display-menu
Most of tmux material I came cross are little bit of dated. The latest
version of tmux at the moment of writing is 3.2a. I think “new” (I am
not sure how new are they) commands like display-popup and
display-menu are really cool. If you are using tmux, and not aware of
them, I think you should give them a try. They might helps you to
improve your workflow. waylonwalker’s blog has some cool ideas on how to
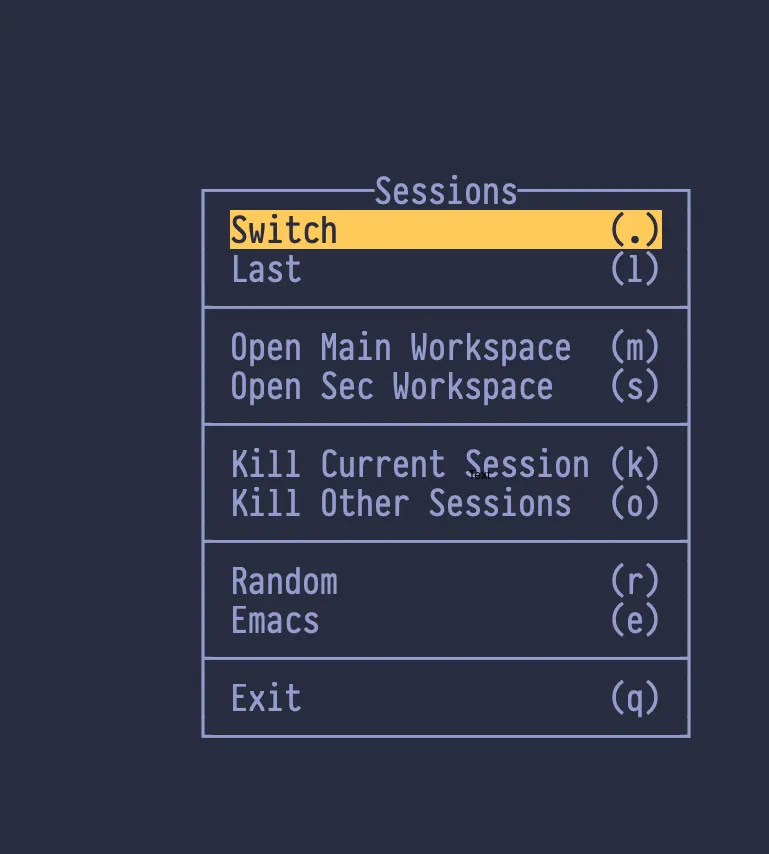
use display-popup. There is an example how I use display-menu and
display-popup
Basically diplay-menu allow you to display a menu on a specific
position with a title. You choose items from Menu using arrow keys or
shortcut, usually item is tmux command. You can optionally add an visual
divider between items.
bind-key Tab display-menu -T "#[align=centre]Sessions" "Switch" . 'choose-session -Zw' Last l "switch-client -l" ${tmuxMenuSeperator} \
"Open Main Workspace" m "display-popup -E \" td ${cfg.mainWorkspaceDir} \"" "Open Sec Workspace" s "display-popup -E \" td ${cfg.secondaryWorkspaceDir} \"" ${tmuxMenuSeperator} \
"Kill Current Session" k "run-shell 'tmux switch-client -n \; tmux kill-session -t #{session_name}'" "Kill Other Sessions" o "display-popup -E \"tkill \"" ${tmuxMenuSeperator} \
Random r "run-shell 'tat random'" Emacs e "run-shell 'temacs'" ${tmuxMenuSeperator} \
Exit q detach"
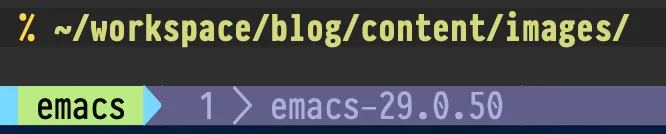
Have a visual cue on tmux prefix press
You might want to hit whether you currently press tmux prefix key or
not. I found this nice
solution
Without press prefix
with prefix press
Mouse or no mouse
Maybe you think the point of tmux is to do mouse-free workflow, to
enable mouse in tmux might seems wrong. But there are certain tasks like
resizing panel are easier with Mouse. You can even set a command to
toggle enabling mouse.
Use oh-my-zsh tmux plugin to start tmux automatically
I am using zsh and oh-my-zsh, it has a
tmux
plugin.
A single nix module
Nix module allows us to group all tmux related configurations (bash
script, zsh and tmux) into a single place.
I was looking for a way to integrate
pre-commit-hooks.nix
and numtide/devshell, I came
across this github
issue. It seems zimbatm
added git.hooks extra module to support git hook integration in
devshell. So I decide to give a try.
Code
I am configuring my devshell using nix, rather than toml file.
I think for toml version, you should just do
devshell.toml
imports = ["git/hooks"]
git.hooks.enable = true
git.hooks.pre-comment = "treefmt"
assuming you already added devshell overlay, we need to import git extra
module, and enable git.hooks and add script for the hook we want to
use. Here i am using
numtide/treefmt.
the most content of this article is a rehash on these listed
contents.
Some of goals of Flakes are
Standardized how we compose nix files and provide a single
entry-point (You don’t have to have default.nix, ci.nix,
shell.nix, of course you can break down your flake file into
smaller nix files).
Standardized nix packages’ dependency management (I think with
Flakes, one doesn’t need niv to
pin down dependencies version. Although niv is great, and its
commands are more user friendly than what Flakes offers right now)
a set of more user friendly nix commands (nix run, nix develop)
better reproducibility
How to install/uninstall Flakes
install
Right now, Nix Flakes is not enabled by default. We need to explicitly
enable it.
NixOS
adding the following in the configuration.nix
{ pkgs,... }: {
nix= {
package=pkgs.nixFlakes;
extraOptions=''
experimental-features = nix-command flakes
'';
};
}
non-NixOS
Terminal window
nix-env-iAnixpkgs.nixFlakes
and add
Terminal window
experimental-features=nix-commandflakes
to ~/.config/nix/nix.conf (if current shell user is nix trusted users)
or /etc/nix/nix.conf
Install Nix Flakes installer I am not sure whether this step is still
needed
You can type nix-env --version to verify. The Flakes version should
looks like nix-env (Nix) 2.4pre20210126_f15f0b8. (the version was 3.0,
and version rollbacked to 2.4)
uninstall
NixOS
just revert the change in configuration.nix and do
nixos-rebuild switch
non-NixOS
nix-env -iA nixpkgs.nix should bring out nix to the mainline
version, and we need to revert the nix.conf change. Of course,
multi-user version needs to restart nix-daemon.
How to bootstrap a Nix Flakes project
use nix flake init to generate the flake.nix, nix flake update to
generate flake.lock file.
An important thing about Flakes, to improve the reproducibility, Flakes
requires us to git staging all the flake.nix changes.
(Selective) Anatomy of flake.nix
Beside description, flake.nix has 2 top-level attributes
inputs (the dependency management part)
outputs the function takes the all inputs we defined and evaluate
a set of attributes. (Usually our build artifacts).
flake-utils ,as its name indicates, is a utility package help us write
flake.
For example, it has
eachDefaultSystem
function take a lambda and iterate through all the systems supported by
nixpkgs an hydra. So we can reuse the same lambda to build for different
systems.
Using flake-utils.lib.eachSystem [ "x86_64-linux" ], you target fewer
systems.
flattenTree takes a tree of attributes and flatten them into a one
level key-value (attribute to derivation), which is what Flakes packages
outputs expects.
devShell=pkgs.haskellPackages.shellFor { # development environment
packages=p: [p."nix-tree"];
buildInputs=withpkgs.haskellPackages; [
cabal-install
ghcid
ormolu
hlint
pkgs.nixpkgs-fmt
];
withHoogle=false;
};
});
}
Let’s break down the function a little bit. The outputs have 2
dependencies nixpkgs and flake-utils.
First thing, it construct an overlay contains the local nix-tree as
Haskell package and a derivation for the executable.
Next, for eachDefaultSystem, it initialize the new nixpkgs with
relevant system and overlay, and construct defaultPackage and
devShell. devShell is Nix Flakes’ version of nix-shell (without -p
capability, if you want to use nix-shell -p, there is nix shell). We
can start a development shell by nix develop command. There is
nix developintegration with
direnv
How to use non-flake dependency
Let’s say if I want to use
easy-purescript-nix
in my project. First I need to add it as inputs
todomvc-nix is a much more complex example. It needs to build Haskell
(even ghcjs, which usually is more chanlleing to build) and rust source
code.
You can checkout the code yourself to see how one can override different
haskell packages and using
numtide/devshell to customize the
nix develop experience.
devshell (not to confuse with Nix Flakes devShell) is numtide project to
customize per-project developer environments. The marketing slogan is
“like virtualenv, but for all the languages”.
I think it is fair to say that devshel is still early stage of
development. (Although one can argue almost every thing mentioned in
this article is in the early stage of development.) Lots of usages are
subject to future changes. Using devshell probably requires you to read
throught the source code. But I think devshell is a really exicting
project.
How to “install” devshell
devshell does aim to support non-Flakes and Flakes Nix. I am only going
to cover the Flakes version, the non-Flakes usage is covered at the
devshell’s
doc.
First thing is to declare devshell as an input, and we need to import
devshell overlay into our instance of nixpkgs.
the overlay would bring devshell attribute into the pkgs. devshell
has functions like
mkShell
and
fromTOML.
fromTOML allows us to configure the devshell using TOML file.
Everytime, you can enter devshell, all commands and a motd (message of
the day) will be displayed. the commands are grouped by their category.
packages won’t show up in there.
I have been trying out google cloud run with a simple haskell + purescript web app. In order to deploy the app, I need to containerize the app and push the docker image to google container registry. I wanted to figure out whether this can be done with nix and some simple github actions. Turns out: with skopep, it is pretty easy!
skopeo copy
After some searching, I found this discourse thread mentions skopeo, and I found this repo using nix flakes and skopeo to push docker image into a private docker registry in github action. So I decided to try out skopeo.
skopeo can push an image from one location to another. It supports Google Container Registry (GCR)
So we can push our image like this
skopeo copy docker-image://$(nix-build -A my-image --no-out-link) docker://gcr.io/google-cloud-project-name/service:tag
install skopeo in github action
I am using install-nix-action in my build step already, so I added a shell script bin in my nix flake, and make it as nix flake app using flakes-utils, which can be run using nix run ".#script"
I was not able to find too much documentation on this step. So I went to some trail and error.
GCR supports different authentication methods. I thought the easiest would to create a service account key with Cloud Storage Admin role, and upload the key content as a secret in github actions.
Of course, we want to replace docker with skopeo. This works locally, but not in github action due to how skope loginworks.
But turns out, we don’t have to do skope login, we can just using skopeo copy --dest-creds.
Put everything together
So I put my service account key, google cloud project name, and the name of the GCR docker image name into github actions as secret, and pass them as env variable in the step, and do nix run ".#upload-script"
I have been learning nix for a while. Overall, I am really happy with
Nix ecosystem. With Nix, home-manager, cachix, you have setup a reliable
and efficient development environment and CI. For demonstration, I want
to show you how I use nix to publish my blog:
If you are new to Nix, I hope you can find something useful in this
blog.
Why Nix ecosystem
Hopefully, at this point you are already sold on nix. If not, maybe
checkout build with nix or
nix.dev. For me, the biggest selling point of is: you
can use a declarative language to set up a reproducible environment for
your local development and CI.
Why Hakyll
This is probably a tough sell if you don’t care about Haskell. Nowadays,
you use tools like Hugo, WordPress, or Jekyll to effortless setup a
static site. I love Haskell, and Hakyll gives me an opportunity to use
Haskell.
Why Firebase
There are lots of decent alternative to Firebase for hosting a static
site. Just to list few
Both templates are very opinionated.
getting-started-nix-template
is a more generic nix template. hakyll-nix-template is Hakyll specified,
it has sitemap, tag support.
Terminal window
.
├──content
|├──about.org
|├──contact.org
|├──css
|├──images
|├──index.html
|├──posts
|└──templates
├──default.nix
├──nix
|├──default.nix
|├──sources.json
|└──sources.nix
├──shell.nix
└──src
scaffold hakyll project using hakyll-init
Hakyll comes with a command line too haskyll-init to scaffold a Hakyll
project. Since we only need haskell-init once, normal nix workflow
would be
Terminal window
nix-shell-ppkgs.haskellPackages.hakyll
but depend on which nix channel is your default channel, you might get
an error about pkgs.haskellPackages.hakyll is broken. We could use
-I flag to pin our one-time shell package to stable version. The
pattern is
-I nixpkgs=https://github.com/NixOS/nixpkgs-channels/archive/{rev}.tar.gz~
hakyll-initcontent#scaffold at ./content directory
The project is just a plain cabal project. We can edit project or
executable name. We can use normal Nix Haskell development workflow.
Nix Haskell Workflow
Currently, there are two major Nix Haskell workflows:
iohk-haskell.nix
and your traditional
nixpgs.
People usually recommend iohk one for complex project, I haven’t used it
at all.
Terminal window
nix-shell-pcabal2nix# unless you already installed cabal2nix globally
Most of the YAML configuration is copied from
getting-started-nix-template. My default.nix only build the Hakyll
program, it doesn’t generate the site. So I added
result/bin/site build in run command. (site is the name of my Hakyll
executable). We need pass generated site directory as
artifacts
between build steps
- name: Archive Production Artifact
uses: actions/upload-artifact@master
with:
name: dist
path: dist
dist is the directory name for the generated site, by default Hakyll
uses _site.
Publish to Firebase
I use w9jds firebase action
to publish the generated static site directory to Firebase. There are
publish actions for netlify and Github Page. Of course, we have to store
our Firebase token as encrypted secret and pass them as environment
variables into the build step.