Statementstatement=connection.createStatement("INSERT INTO t_actor (first_name, last_name ) VALUES (?fName, ?lName"));
statement.bind("fName", ...)
.bind("lName", ...);
// statement.add need to called for non-head non-tail element
statement.add();
statement.bind("fName", ...)
.bind("lName", ...);
returnFlux.from(statments.execute());
});
Statement.add needs to invoked correctly.
Save the current binding and create a new one to indicate the statement should be executed again with new bindings provided through subsequent calls to bind and bindNull.
Otherwise, java.lang.IllegalStateException: Not all parameter values are provided yet. might occur.
Batch doesn’t support bind. It only can work with string. Unless the batch update only involve constant, which sounds unlikely, sql-injection should be a concern, using Statement should be a safer approach.
Compose batches
Flux.thenMany could be use to compose two Flux.from(Statement.execute)
Transaction
One can add transaction management around the batch update in the follow fashion.
In reactor, sometime we want to give certain operation return type like Mono<Void>, like we don’t need any information from the operation, as long as the operation succeed. In this sense, we are using Void as Unit type
The Void class is an uninstantiable placeholder class to hold a reference to the Class object representing the Java keyword void.
So Void supposes to be uninstantiable, but in practices, people use it as unit type along with null
implication in project reactor
In project reactor, there is Mono.zip
Aggregate given monos into a new Mono that will be fulfilled when all of the given Monos have produced an item, aggregating their values according to the provided combinator function. An error or empty completion of any source will cause other sources to be cancelled and the resulting Mono to immediately error or complete, respectively.
this method doesn’t work well with Mono<Void>
importorg.assertj.core.api.Assertions;
importorg.junit.jupiter.api.DisplayName;
importorg.junit.jupiter.api.Test;
importreactor.core.publisher.Mono;
importreactor.test.StepVerifier;
publicclassUnitTest {
@DisplayName("prove Mono void is not zip able, otherwise pipeline should have one element")
I throw all my tmux configuration (along with some basic alacritty and
starship configuration) into a nix
module.
I really enjoy using it so far. I hope it can give you some ideas about
how to potentially improve your workflow
Longer version
Before using Nix, I had very limited experience with Tmux. I think I
only used once when I ssh into some ec2 box for doing mutlipy long
running jobs. After adpating Nix, I started to try out Alacirtty (I was
having a hard time to get Kitty build on MacOS with Nix), I really like
Alacirtty, but it doesn’t support tabs or split, the community
recommends using window manager or terminal multiplexer. The idea didn’t
bother me too much. (I brought a tmux
2 book long before that,
never read it), I thought to myself: maybe this is a good oppurity to
learn tmux. So I skip through the book, and set up tmux with basic
configuration using nix home manager, and back to everyday work. I
didn’t leverage tmux too much, and I often feel like I should spend some
more time to tweak my configuration, so it suits my use case better. One
day I came across waylonwalker’s
blog, which introduce Chirs
Toomy’s thoughtbot course on tmux to me. These materials really give me
lots of ideas, and after some embarrassing long hours, I finally manage
to put all my tmux configuration into a single nix module.
Here are some lessons and tricks I learned:
display-popup and display-menu
Most of tmux material I came cross are little bit of dated. The latest
version of tmux at the moment of writing is 3.2a. I think “new” (I am
not sure how new are they) commands like display-popup and
display-menu are really cool. If you are using tmux, and not aware of
them, I think you should give them a try. They might helps you to
improve your workflow. waylonwalker’s blog has some cool ideas on how to
use display-popup. There is an example how I use display-menu and
display-popup
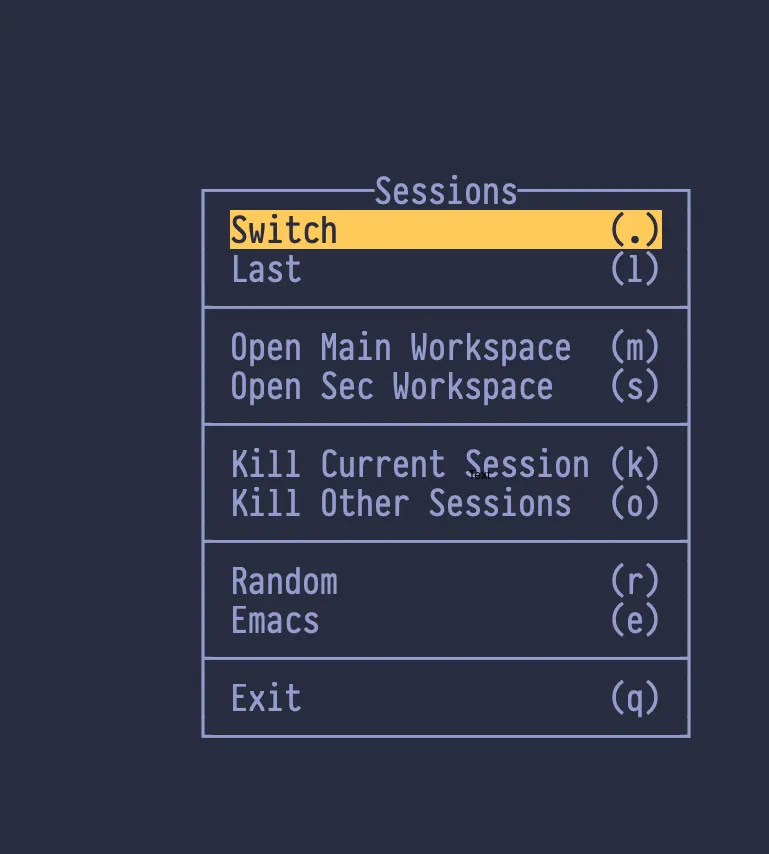
Basically diplay-menu allow you to display a menu on a specific
position with a title. You choose items from Menu using arrow keys or
shortcut, usually item is tmux command. You can optionally add an visual
divider between items.
bind-key Tab display-menu -T "#[align=centre]Sessions" "Switch" . 'choose-session -Zw' Last l "switch-client -l" ${tmuxMenuSeperator} \
"Open Main Workspace" m "display-popup -E \" td ${cfg.mainWorkspaceDir} \"" "Open Sec Workspace" s "display-popup -E \" td ${cfg.secondaryWorkspaceDir} \"" ${tmuxMenuSeperator} \
"Kill Current Session" k "run-shell 'tmux switch-client -n \; tmux kill-session -t #{session_name}'" "Kill Other Sessions" o "display-popup -E \"tkill \"" ${tmuxMenuSeperator} \
Random r "run-shell 'tat random'" Emacs e "run-shell 'temacs'" ${tmuxMenuSeperator} \
Exit q detach"
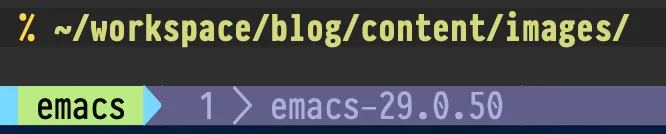
Have a visual cue on tmux prefix press
You might want to hit whether you currently press tmux prefix key or
not. I found this nice
solution
Without press prefix
with prefix press
Mouse or no mouse
Maybe you think the point of tmux is to do mouse-free workflow, to
enable mouse in tmux might seems wrong. But there are certain tasks like
resizing panel are easier with Mouse. You can even set a command to
toggle enabling mouse.
Use oh-my-zsh tmux plugin to start tmux automatically
I am using zsh and oh-my-zsh, it has a
tmux
plugin.
A single nix module
Nix module allows us to group all tmux related configurations (bash
script, zsh and tmux) into a single place.
I was looking for a way to integrate
pre-commit-hooks.nix
and numtide/devshell, I came
across this github
issue. It seems zimbatm
added git.hooks extra module to support git hook integration in
devshell. So I decide to give a try.
Code
I am configuring my devshell using nix, rather than toml file.
I think for toml version, you should just do
devshell.toml
imports = ["git/hooks"]
git.hooks.enable = true
git.hooks.pre-comment = "treefmt"
assuming you already added devshell overlay, we need to import git extra
module, and enable git.hooks and add script for the hook we want to
use. Here i am using
numtide/treefmt.
the most content of this article is a rehash on these listed
contents.
Some of goals of Flakes are
Standardized how we compose nix files and provide a single
entry-point (You don’t have to have default.nix, ci.nix,
shell.nix, of course you can break down your flake file into
smaller nix files).
Standardized nix packages’ dependency management (I think with
Flakes, one doesn’t need niv to
pin down dependencies version. Although niv is great, and its
commands are more user friendly than what Flakes offers right now)
a set of more user friendly nix commands (nix run, nix develop)
better reproducibility
How to install/uninstall Flakes
install
Right now, Nix Flakes is not enabled by default. We need to explicitly
enable it.
NixOS
adding the following in the configuration.nix
{ pkgs,... }: {
nix= {
package=pkgs.nixFlakes;
extraOptions=''
experimental-features = nix-command flakes
'';
};
}
non-NixOS
Terminal window
nix-env-iAnixpkgs.nixFlakes
and add
Terminal window
experimental-features=nix-commandflakes
to ~/.config/nix/nix.conf (if current shell user is nix trusted users)
or /etc/nix/nix.conf
Install Nix Flakes installer I am not sure whether this step is still
needed
You can type nix-env --version to verify. The Flakes version should
looks like nix-env (Nix) 2.4pre20210126_f15f0b8. (the version was 3.0,
and version rollbacked to 2.4)
uninstall
NixOS
just revert the change in configuration.nix and do
nixos-rebuild switch
non-NixOS
nix-env -iA nixpkgs.nix should bring out nix to the mainline
version, and we need to revert the nix.conf change. Of course,
multi-user version needs to restart nix-daemon.
How to bootstrap a Nix Flakes project
use nix flake init to generate the flake.nix, nix flake update to
generate flake.lock file.
An important thing about Flakes, to improve the reproducibility, Flakes
requires us to git staging all the flake.nix changes.
(Selective) Anatomy of flake.nix
Beside description, flake.nix has 2 top-level attributes
inputs (the dependency management part)
outputs the function takes the all inputs we defined and evaluate
a set of attributes. (Usually our build artifacts).
flake-utils ,as its name indicates, is a utility package help us write
flake.
For example, it has
eachDefaultSystem
function take a lambda and iterate through all the systems supported by
nixpkgs an hydra. So we can reuse the same lambda to build for different
systems.
Using flake-utils.lib.eachSystem [ "x86_64-linux" ], you target fewer
systems.
flattenTree takes a tree of attributes and flatten them into a one
level key-value (attribute to derivation), which is what Flakes packages
outputs expects.
devShell=pkgs.haskellPackages.shellFor { # development environment
packages=p: [p."nix-tree"];
buildInputs=withpkgs.haskellPackages; [
cabal-install
ghcid
ormolu
hlint
pkgs.nixpkgs-fmt
];
withHoogle=false;
};
});
}
Let’s break down the function a little bit. The outputs have 2
dependencies nixpkgs and flake-utils.
First thing, it construct an overlay contains the local nix-tree as
Haskell package and a derivation for the executable.
Next, for eachDefaultSystem, it initialize the new nixpkgs with
relevant system and overlay, and construct defaultPackage and
devShell. devShell is Nix Flakes’ version of nix-shell (without -p
capability, if you want to use nix-shell -p, there is nix shell). We
can start a development shell by nix develop command. There is
nix developintegration with
direnv
How to use non-flake dependency
Let’s say if I want to use
easy-purescript-nix
in my project. First I need to add it as inputs
todomvc-nix is a much more complex example. It needs to build Haskell
(even ghcjs, which usually is more chanlleing to build) and rust source
code.
You can checkout the code yourself to see how one can override different
haskell packages and using
numtide/devshell to customize the
nix develop experience.
devshell (not to confuse with Nix Flakes devShell) is numtide project to
customize per-project developer environments. The marketing slogan is
“like virtualenv, but for all the languages”.
I think it is fair to say that devshel is still early stage of
development. (Although one can argue almost every thing mentioned in
this article is in the early stage of development.) Lots of usages are
subject to future changes. Using devshell probably requires you to read
throught the source code. But I think devshell is a really exicting
project.
How to “install” devshell
devshell does aim to support non-Flakes and Flakes Nix. I am only going
to cover the Flakes version, the non-Flakes usage is covered at the
devshell’s
doc.
First thing is to declare devshell as an input, and we need to import
devshell overlay into our instance of nixpkgs.
the overlay would bring devshell attribute into the pkgs. devshell
has functions like
mkShell
and
fromTOML.
fromTOML allows us to configure the devshell using TOML file.
Everytime, you can enter devshell, all commands and a motd (message of
the day) will be displayed. the commands are grouped by their category.
packages won’t show up in there.